Big This Week

Recent Posts

Wednesday, 27 February 2013

Barry M Mint Madness

Hi Everyone,

I have a review on the new Barry M nail paints! I have been desperately trying to find these, according to my local Superdrug they don't exist :/ But Ive finally found them, I was going to get other colours (Gelly Hi-Shine in Lychee) but they were sold out and I didn't fancy any of the others at the moment.
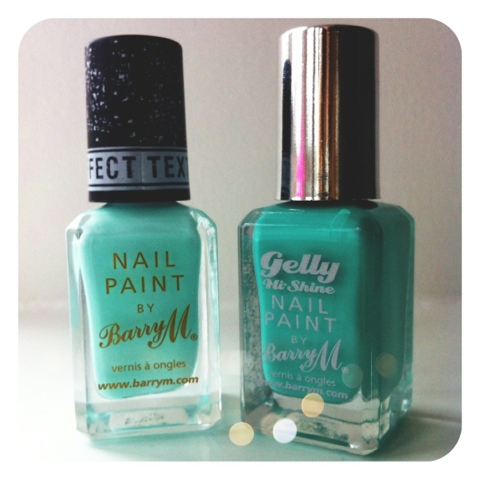
I got one of the new Spring Gelly Hi-Shine Nail Paints and one of the new Textured Effect Nail Paints, Which I couldn't wait to try! I got both in a mint colour, as my first ever Barry M Nail Paint was in Mint Green and has to be my all time favourite!
Firstly is the Gelly Hi-Shine in Greenberry, This is part of the new spring range of Gelly Hi-Shine's. There are three other colours in this range called Lychee (Grey-Nude), Dragon Fruit (Pink with a slight shimmer) and Papaya (Peachy Coral). These dry to a very shiny, "Just had a Salon Gel manicure", Finnish. People do say you can do it in just one coat, but I had to apply Greenberry in two coats as just one was too streaky.

Lastly is the polish Ive been most excited for, Ridley Road Textured Effect Nail Paint! All of these Nail Paints are named after roads which the creator of Barry M (Barry Mero) set up stalls on. The other three shades in the range include Atlantic Road (Bright Blue), Kingsland Road ( Pale Pink) and Station Road (Bright Yellow with Shimmer), These are all very similar to colours from the Ice-Cream Nail Paint range.

These Remind me of the O.P.I Liquid Sand Polishes in texture, they dry very quickly and Ridley Road needed two coats , maybe three depending how you wanted the finish to be. The finish is kind of matte but reflects the light well. 

I found both polishes were very quick and easy to remove, I cant wait to get a hold of the other colours in both ranges! 
You can get both ranges here; Gelly Hi-Shine and Textured Effect

Have you tried the Gelly Hi-Shine or Textured Effect Nail Paints, What did you think? Which effect is your favourite?

Eloise x
Share:

Monday, 25 February 2013

MUA Undress Review

Hi Everyone,

Today I have a post I've been desperate to get up for days, but I just couldn't get a hold of the Undress Me Too palette, but I have today! So here's a review on both the Undress Me Too palette and Undress Your Skin Shimmer Highlighter! Both in their brand new white packaging!

Firstly is the Undress Your Skin Shimmer Highlighter, this does remind me of the design of the MAC Extra Dimension Skin Finishes crossed with the MAC Mineralise Skin Finishes, which are very hard to get a hold of! My IPhone camera kinda picks it up as a orange colour when in fact it is pink, when swatched it did scare me a bit but once blended out its a very pale pink shimmer, which looks great on the cheekbones and temple.

Next is a very wanted and popular product, its the Undress Me Too palette which is very similar to the Urban Decay Naked 2 Palette, sadly I don't have the Naked 2 palette so I cant compare.
This palette Contains three matte Shades and nine shimmer shades, Practically identical to Naked 2, The matte shades are a little chalky, but are quite pigmented, the black shade being the most pigmented. The shimmer shades of the palette are very creamy and easy to work with, they can be built up very well and are extremely pigmented.

Top Row: Naked (Matte), Devotion, Shy
Second Row: Fiery, Lavish, Dreamy
Third Row: Tranquil, Exposed (Matte), Reveal
Bottom Row: Wink, Obsessed, Corrupt (Matte)


(Swatched Left to Right Top Half): Naked (Matte), Devotion, Shy, Fiery, Lavish, Dreamy
(Swatched Left to right Bottom Half): Tranquil, Exposed (Matte), Reveal, Wink, Obsessed, Corrupt (Matte)
(Swatched Bottom to Top Right Side): Undress Your Skin Highlighter; Heavily Swatched, Lightly Swatched, Blended

I'm in love with this new palette and saves me quite a bit of money as much as I want the Naked 2 Palette, I think I may have to pick up a few other pieces from the Undress Me Range!

You can Get them here: Undress Me Too Palette , Undress Your Skin Shimmer Highlighter

Have you tried any bits from the new Undress Me Range? What do you think about the Undress Me Too Palette?

Eloise x

Share:

Saturday, 16 February 2013

F.O.T.D and N.O.T.D: Valentines Edition

Hi Everyone, 

Today is a bit of a different post, this is my first Face of the Day and Mini Nails of the day post, Inspired by Valentines Day and for a dinner I went to with Mary and some other friends for a Non Valentines "Valentines Day" Dinner the day after Valentines Day (Confusing, I know) and this is what I used.
Face:
Clarins Beauty Flash Balm 
Clarins Skin Illusion Foundation in 103 Ivory
Collection Lasting Perfection Concealer in Fair
Bourjois Mineral Radiance Pressed Powder in 02 Vanilla
MUA Undress Your Skin Shimmer Highlighter

I used the Clarins Flash Balm under the Skin Illusion Foundation and both together they create a amazing finish to the skin and it lasts extremely well, I had it on for around 5 hours before I took it off and I didn't see much difference. I then used My favourite concealer, Lasting Perfection, To just add that slightly more coverage to the areas I needed. Finally setting with the Bourjois Radiance Powder and adding a bit of MUA Shimmer Highlighter (Review Coming Soon) to my cheek bones, then that was my base and cheeks done!

Eyes:
MAC Paint Pot in Soft Ochre
MAC Eyeshadow in Naked Lunch
ELF Cream Eyeliner in Black
Illamasqua Eyeshadow in Lestat

Brows:
MAC Eyeshadow in Omega
MAC Eyeshadow in Vanilla
I used Mac Soft Ochre as a base and then added Mac Naked Lunch all over the lid and a tiny bit up to the crease, I then added a slight line with ELF Cream Eyeliner really close to the lash line to add a bit more volume and went over it with Illamasqua Lestat to soften, then ran a little under my eyes. I didn't use the Lashes unfortunately as I ran out of time, but I did curl my lashes, I didn't need any mascara as I had already had them tinted.

For my brows I softly added a bit of Mac Omega in the areas needed, Then placed Vanilla on my brow bone.

Lips: 
NYX Soft Matte Lip Cream in San Paulo

Nails:
Barry M Nail Paint in Pink Flamingo
O.P.I Nail Varnish in Pink Yet Lavender
O.P.I Nail Varnish in Nothin' Mousie 'Bout It

Then to complete the look for lips I just used NYX San Paulo all over the lips by its self.

For my nails I used two coats of Barry M Pink Flamingo, Then just on my ring fingers I used a coat of O.P.I Pink Yet Lavender (Not pictured as it was a last minute thing, sorry), Then added a coat of O.P.I Nothin' Mousie 'Bout it over the top, dotting on the little hearts! 


There's the finished looks, Hopefully next time I'll remember to add a close up of the make up, I was just too tired when I got back, sorry. I hope everyone had a nice Valentines Day or Non Valentines "Valentines Day" in this case.

Have you tried any of these products? How do you like them? What did you choose as your Valentines Day look?

Eloise x


Share:

Tuesday, 12 February 2013

Killer Colours Firewater

Hi Everyone,

I Thought id review a polish that I'm not sure gets talked about a lot compared to other nail brands, This is Firewater by Killer Colours. I picked this up at the Clothes Show Live at the start of December, Kinda recognising the name but the poster of Millie Mackintosh drew me in!
 I knew Millie Mackintosh is a big fan of these Nail Polishes and I love Milly so I just had to give them a try. Charlotte Tilbury is also a fan!
I only picked up the one from the very small stand at the Clothes Show, I wasn't too sure what to expect, I have since found out though that Killer Colours only release small collections one at a time, These Collections tie into the current fashion trends and statements of the season, Quite a clever idea I think!
Firewater is a deep Raspberry/ Red Wine shade, Which I think is always a classic during the winter months, Its inspired by the A/W 2012 Catwalks of names such as Gucci, DKNY and Viktor and Rolf.
 
It is extremely Glossy and Killer Colours add no Toluene, DBP, Formaldehyde aka the Big 3! I found this shade was extremely pigmented just after one coat, I wasn't going to add a second at first. I found it also dried quite quickly and the brush isn't too big or too thin.
However I do have a lot of similar shades so I thought id compare them:

Swatches (Left to Right:) Killer Colours Firewater (One Coat), Killer Colours Firewater (Two Coats), Nails Inc Victoria (Two Coats), Barry M Red Wine (Two Coats), Barry M Red Black (Two Coats).
The closest match I could find is Barry M Red Black at a 3rd of the price at £2.99, It still isn't a exact match to Firewater though.
Nails Inc Victoria is also very similar but a bit more expensive at £11.
Killer Colours can be found here and Retail for £9, Which I think is rather good!
Have you tried Killer Colours? Do you love them too?
Eloise x
Share:
Blog Design Created by pipdig